 菡萏如佳人
菡萏如佳人文章目录
Springboot装配指南
要深刻了解Springboot的自动装配,我们还得从spring的各种装配开始讲起。
模式注解
模式注解概念
什么叫模式注解?点击查看官方介绍。
简而言之:模式注解是一种用于声明在应用中扮演“组件”角色的注解。如 Spring Framework 中的 @Service标注在任何类上 ,用于扮演服务角色的模式注解。
我们可以看下面几个常见的模式注解:

@Component 作为一种由 Spring 容器托管的通用模式组件,任何被 @Component 标注的组件均为组件扫描的候选对象。
其它几个组件我们看下他们的源码,以@Service为例子:
@Target({ElementType.TYPE})
@Retention(RetentionPolicy.RUNTIME)
@Documented
@Component //作为Service注解的元标注
public @interface Service {
 @AliasFor(annotation = Component.class) //属性互为别名
 String value() default "";
}
看来@Service 其实和@Component基本是等价的,就像类的继承派生一样,更具里氏替换原则,在使用@Service的地方我们完全都可以使用@Component
不过为了使我们Bean具备不同的角色,我们还是要按照它们扮演的角色那样去使用它们。其实我们Springboot工程启动类注解@SpringBootApplication也是模式注解,它也是基于@Component 多层次“派生”出来的。关系如下:
@SpringBootApplication => @SpringBootConfiguration => @Configuration => @Component
当然@SpringBootApplication其实是一个比较复杂的组合注解,其它注解就不展开叙述了,后面会单独谈一谈@SpringBootApplication
模式注解的装配
上面只是讲了通过@Component 及派生出来的其它模式注解是用来告诉Spring容器,将被它们标注过的类或方法等作为一个组件(Bean),那这些组件怎么被扫描装配呢?
在Spring中一般有两种方式:
<beans ...
<!-- 激活注解驱动 -->
<context:annotation-config />

<context:component-scan base-package="com.imooc.dive.in.spring.boot" />
</beans>
- @ComponentScan 方式,通过注解
@ComponentScan(basePackages = "com.hzqiuxm.app")
public class SpringConfiguration {
...
}
自定义模式注解
熟悉了@Component作用原理和@Service等派生注解的作用,我们要实现一个自定义模式注解,可谓信手拈来:
/**
 * Copyright © 2018年 moc. All rights reserved.
 *
 * @author 临江仙 hzqiuxm@163.com
 * 自定义注解
 * @date 2019/1/17 11:30
 * @Since 1.0.0
 */
@Target({ElementType.TYPE})
@Retention(RetentionPolicy.RUNTIME)
@Documented
@Component //替换成@Service 等也一样
public @interface MyFirstLevelComponent {
    String value() default "";
}
你还可以再定义个注解MySceondLevelComponent,使用@MyFirstLevelComponent 去标注它,这样你就派生出了一个有层次的自定义注解了:
@Component => @MyFirstLevelComponent => @MySceondLevelComponent 你可以规定不同业务层级使用不同的注解来规范架构设计
模块装配
试想一下,如果只有模式注解,那得一个个声明很多角色Bean,Spring Framework 3.1 开始支持”@Enable 模块驱动“。
所谓“模块”是指具备相同领域的功能组件集合, 组合所形成一个独立的单元。比如 Web MVC 模块、AspectJ代理模块、Caching(缓存)模块、JMX(Java 管 理扩展)模块、Async(异步处理)模块等。
Spring中常见框架@Enable模块举例:
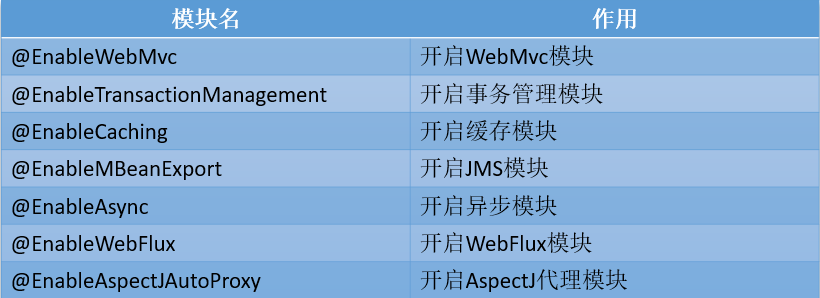
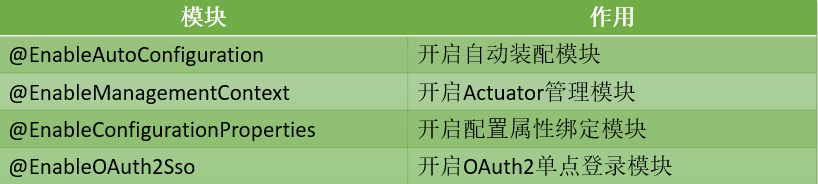
蓝色属于Spring Framework ,绿色属于Springboot
模块装配实现方式
- 注解驱动方式 ,比如:@EnableWebMvc,可以查看源码跟踪其实现
EnableWebMvc注解类通过@Import一个@Configuration标注类,在@Configuration中通过@Bean来声明要生成的Bean,特点是比较简单固定
- 接口编程的方式,比如:@EnableCaching,可以查看源码跟踪其实现
EnableCaching注解类通过@Import一个实现了ImportSelector接口的某类,某类实现selectImports()方法完成Bean的生成,特点是叫复杂,可以根据逻辑来选择返回多个Bean
自定义Enable模块装配
- 第1步:编写一个生成Bean的类
public class OneBeanConfiguration {
    @Bean
    public String oneBean(){
        return "one Bean is created!";
    }
}
- 第2步:如果是接口编程方式还需要实现一个ImportSelector接口实现类,不是的话跳过这步
public class OneBeanImportSelector implements ImportSelector {
    @Override
    public String[] selectImports(AnnotationMetadata importingClassMetadata) {
        return new String[]{OneBeanConfiguration.class.getName()};
    }
}
- 第3步:编写EnableXXX注解类,Import导入前面的实现类
@Retention(RetentionPolicy.RUNTIME)
@Target(ElementType.TYPE)
@Documented
@Import(OneBeanConfiguration.class) //注解方式
//@Import(OneBeanImportSelector.class) //接口实现方式
public @interface EnableOneBean {
}
- 第4步:测试
@EnableOneBean  //加上Enable模块注解
public class OneBeanBootstrap {
    public static void main(String[] args) {
        ConfigurableApplicationContext context = new SpringApplicationBuilder(OneBeanBootstrap.class)
                .web(WebApplicationType.NONE)
                .run(args);
        String oneBean = context.getBean("oneBean", String.class);
        System.out.println("oneBean = " + oneBean);
        context.close();
    }
}
条件装配
接下来讲一下功能强大的条件装配,从 Spring Framework 3.1 开始,允许在 Bean 装配时增加前置条件判断。不过3.1的时候只支持@Profile注解方式,这种配置型的条件装配功能还不是很强大。到了4.0,引入了@Conditional编程条件方式,就相当灵活了
- Profile的配置条件:通过在具体Bean上标注@Profile(”参数“),根据Spring容器根据参数来选择是否初始化该Bean
- Conditional编程条件:通过实现Condition接口,通过内部的matches()方法来判断是否初始化,matches()方法返回boolean值
自定义条件装配(Conditional方式)
- 第1步:自定义实现Condition接口的matches()方法,作为一种判断机制
public class OnCheckNameCondition implements Condition {
    @Override
    public boolean matches(ConditionContext context, AnnotatedTypeMetadata metadata) {
        //获取某注解类的属性值
        Map<String, Object> attributes = metadata.getAnnotationAttributes(ConditionalCheckName.class.getName());
        //获取name属性值
        String name = String.valueOf(attributes.get("name"));
        //为了实现方便我们直接拿name的值来和某个固定字符串做比较
        return "hzqiuxm".equals(name);
    }
}
- 第2步:实现自定义条件注解类,使用@Conditional引入上一步的具体条件判断
@Retention(RetentionPolicy.RUNTIME)
@Target({ ElementType.TYPE, ElementType.METHOD })
@Documented
@Conditional(OnCheckNameCondition.class)
public @interface ConditionalCheckName {
    String name() default "";
}
- 第3步:测试使用自定义注解类,构造条件是否满足判断机制来验证
public class ConditionBootstrap {
    @Bean
    @ConditionalCheckName(name="hzqiuxm")
    public String testCondition(){
        return "测试条件装配";
    }
    public static void main(String[] args) {
        ConfigurableApplicationContext context = new SpringApplicationBuilder(ConditionBootstrap.class)
                .web(WebApplicationType.NONE)
                .run(args);
        String testCondition = context.getBean("testCondition", String.class);
        System.out.println("testCondition = " + testCondition);
        context.close();
    }
}
自动化装配
从模式注解装配到模块装配再到条件装配,我们总算快凑齐了自动化装配的所有龙珠。在 Spring Boot 中,自动装配是其三大特性之一。它基于约定大于配置的原则,实现中使用了:
- Spring 模式注解装配
- Spring @Enable 模块装配
- Spring 条件装配
- Spring 工厂加载机制
看完之后大家是不是觉得我们就差最后一块拼图工厂加载机制了?
工厂加载机制的机制也很简单:它由SpringFactoriesLoader类实现,在使用时需要进行资源配置(就是META-INF/spring.factories文件配置)
自动化配置实现
在前面几个例子的基础上,我们来做一个springboot自动化配置的例子(starter pom原理也是如此)
- 第1步:激活自动装配 - @EnableAutoConfiguration
写一个引导类,引导上加上@EnableAutoConfiguration
@EnableAutoConfiguration
public class EnableMyAutoConfigurationBootstrap {
    public static void main(String[] args) {
        ConfigurableApplicationContext context = new SpringApplicationBuilder(EnableMyAutoConfigurationBootstrap.class)
                .web(WebApplicationType.NONE)
                .run(args);
        //检查Enable装配的oneBean
        String oneBean = context.getBean("oneBean", String.class);
        System.out.println("oneBean = " + oneBean);
        context.close();
    }
}
- 第2步:实现自动装配 - XXXAutoConfiguration
创建MyAutoConfiguration类,使用上模式注解、模块装配、条件装配
@Configuration //模式注解装配
@EnableOneBean //模块装配
@ConditionalCheckName(name = "hzqiuxm")//条件装配满足条件才会去自动装配
public class MyAutoConfiguration {
}
- 第3步:配置自动装配实现 - META-INF/spring.factories
在resource目录下新建目录和文件META-INF和spring.factories,在文件中添加一对key/value值,key是固定的,value是第2步自动装配类的全路径
#自动装配
org.springframework.boot.autoconfigure.EnableAutoConfiguration=\
com.springboot2.moc.configuration.MyAutoConfiguration
使用第1步的引导类进行测试
小结
从整理装配的历程来看,我们可以看到任何事务的发展都不是一蹴而就的,springboot的自动装配经历了最早的模式注解装配,让各组件的角色可以分开。
在工程架构中,我们可以使用不同的模式注解来代表不同的组件,和我们分层架构互相结合;因为考虑到功能中模块化,所以发展除了Enable为前缀的模块装配方式,使得一组功能相近的Bean可以一起初始化生成;再后来为了灵活性引入了@Profile条件配置,但是因为Profile灵活性不够,只能已配置方式进行,所以后来又加入了@Conditional编程条件配置,最大化话满足条件配置。
最后结合Spring 工厂加载机制,实现了目前的自动化配置。弄清楚装配发展历程,对我们阅读spring源码也是十分有帮助,我们会清楚的知道各个地方这么实现的原因与局限性,也是我们以后做自定义扩展的基础。